The setting is painfully familiar: you’re half-dressed, your phone is screaming with notifications, and the mirror is reflecting… a birds’ nest.
Your hair was supposed to be “effortlessly chic.” Instead, you’re holding a hair tie in your mouth, scrolling bun tutorials with your free hand, already late.
You twist, you wrap, you pin. The bun collapses. You start again, redo the ponytail, and there goes another five minutes you didn’t have.
Then you see someone on the train, hair in a perfect loose bun that somehow looks both casual and expensive. You wonder what secret manual you missed out on growing up.

There is a trick.
A tiny change in the way you start that changes everything at the end.
The real reason your “quick bun” takes 10 minutes
Most rushed buns start with the same move: gather, twist, wrap, pray.
It feels instinctive, so we repeat it every morning, then blame our hair type when it slumps by 11 a.m.
Look around: at the office, in cafés, on the metro, you can almost guess who did a “panic bun” in the lift.
The hair is tight at the nape, too flat on top, pins peeking out like antennae.
A chic bun is rarely about perfect technique.
It’s about one tiny step at the beginning that builds volume and structure before you even twist.
Take Léa, 29, who works in PR and lives on coffee and last-minute Zoom calls.
She told me she used to block out a full ten minutes for her hair every morning, “just to not look like I slept at my desk.”
Her routine was classic: ponytail, twist, wrap, pin until her scalp hurt.
The bun looked neat for twenty minutes, then slowly drooped into a sad, low knot.
One day, in the bathroom at work, she watched a colleague create a loose, polished bun in under 40 seconds.
Same elastic. Same length of hair. Different first move.
Léa copied it the next day.
Now she does her bun while the kettle boils.
What changes everything is where the volume sits and how the hair holds itself.
Most buns fail because the base is either too tight or too flat, so the twist has nothing to “sit” on.
A chic bun needs a small cushion of air at the crown and a stable, not-strangled, base.
Once you have that, the hair coils around itself instead of sliding down like a heavy rope.
This is why you can see two women with almost identical hair achieve totally different results in the same time.
One is fighting gravity. The other is quietly using it.
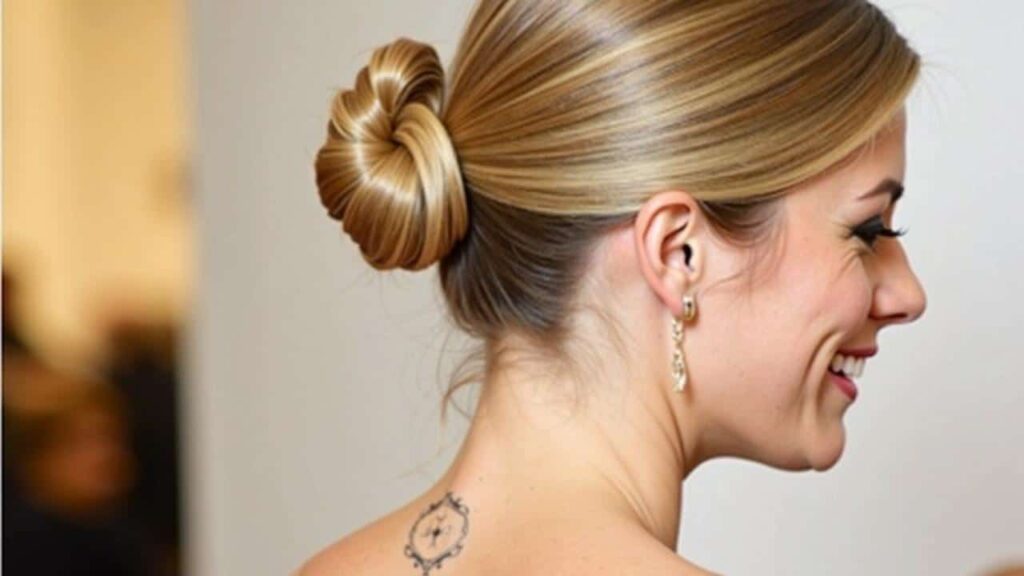
The under-a-minute trick: the looped pony bun
Here’s the move that changes everything: the looped pony.
It turns your regular hair tie into an instant bun structure.
Gather your hair as if you’re doing a mid-height ponytail.
On the last turn of the elastic, don’t pull the hair all the way through.

Stop halfway and create a soft loop with the lengths hanging out underneath.
Then, take the loose ends, gently twist them, and wrap them around the base of that loop.
Tuck the ends into the elastic or slide in two crossed bobby pins at the back.
Pinch the loop with your fingers to open it slightly and create that easy, expensive-looking volume.
This trick works because the “bun” is half-done the second you create the loop.
You’re no longer wrestling a long, heavy ponytail into submission.
Most people pull their ponytail ultra-tight, then try to soften it with their fingers at the end.
That’s when the whole structure loosens and starts to slip.
Instead, start slightly looser, especially at the crown.
Tilt your head back a little while you gather your hair: it leaves just enough slack on top for a natural curve when you straighten again.
Let’s be honest: nobody really blow-dries and smooths their hair every single day.
This trick loves a bit of texture, a bit of yesterday’s waves, even a bit of dry shampoo buildup.
You might be thinking, “Every time I try something like this, I end up with a lopsided mess.”
That’s not a failure, that’s just your personal hair map revealing itself.
If your bun collapses, you’re probably pulling the loop too tight, or wrapping the ends with too much tension.
Think “secure but soft”, not “gym ponytail ready for sprinting.”
“The day I stopped trying to make my bun perfect was the day it finally started to look expensive,” a hairstylist told me backstage at a small fashion show. “The camera reads attitude, not symmetry.”
- Loosen the front with two fingers after tying: it softens the hairline and avoids “ballet scalp.”
- Angle the bun slightly off-center for a French-girl vibe instead of a strict topknot.
- Add one invisible pin at the top of the bun to stop the loop from sagging over time.
- Use a matte texturizing spray if your hair is very clean and slippery.
- Skip perfection: a tiny piece falling out at the nape looks lived-in, not messy.
From rushed knot to signature look
Once you’ve done the looped pony bun a few times, your hands learn the path by heart.
Your brain can be thinking about your first meeting, your shopping list, your day ahead, while your fingers do their 40-second choreography.
That’s the quiet power of a simple hair trick: it frees mental space.
No more scrolling through tutorials, no more redoing your bun three times before leaving the house.
You might start adapting it without noticing.
Lower for a soft Sunday, higher and tighter for a blazer and lipstick kind of day, decorated with a silk ribbon at night.
*One basic movement, endless versions, always that same nonchalant elegance.*
| Key point | Detail | Value for the reader |
|---|---|---|
| Looped pony base | Stop on the last turn of the elastic to create a hair loop, then wrap the ends | Transforms a rushed knot into a structured bun in under a minute |
| Soft volume on top | Gather hair with head tilted back slightly, then loosen the front | Gives a relaxed, chic shape instead of a flat, pulled-back look |
| Minimal tools | One elastic, two pins, a bit of texture spray if desired | Makes the routine easy to repeat on busy mornings or on the go |
FAQ:
- Question 1Can this one-minute bun work on very thick hair?Yes, but go for a stronger elastic and create a slightly larger loop. You might need three pins instead of two, crossing them like an X for extra hold.
- Question 2What if my hair is very fine and the bun looks tiny?Use dry shampoo or a texturizing spray first, and avoid over-brushing. You can also gently tug the loop outwards to enlarge the bun without pulling the base.
- Question 3Does this trick work on freshly washed hair?Freshly washed hair is often too slippery. Add a bit of dry shampoo or styling cream, or even braid your hair loosely for ten minutes before, then undo and do the looped bun.
- Question 4How do I stop bumps forming at the back of my head?Run your fingers, not a brush, through your hair as you gather it. If a bump appears, slide one flat pin underneath the bump and push it down gently toward the nape.
- Question 5Can I use this bun for a more formal event?Yes. Keep the bun a little lower, smooth the front slightly with a serum, and hide the elastic with a thin strand of hair wrapped around and pinned underneath for a cleaner finish.