The first moment you notice your eyebrows thinning can feel oddly emotional. It might happen under harsh bathroom lighting in the morning or in a casual selfie where your eyes suddenly look less defined. The outer edges appear sparse, the arch seems to vanish from certain angles, and no amount of pencil really fixes it. That’s usually when the idea of a salon brow lamination starts to feel tempting. Then reality sets in—the appointment, the cost, the travel, the chemical smells. You close the browser, rinse your face, and quietly decide there has to be a simpler way.
Simple Brow Lamination at Home
The Calm Power of Shaping Your Own Brows
There’s something unexpectedly grounding about sitting at your bathroom counter late at night, the fan humming softly and your favorite playlist playing in the background, realizing you can change how your brows look with just a few careful steps and a bit of patience. No salon lights. No forced conversation. Just you, a mirror, and a tiny brush.
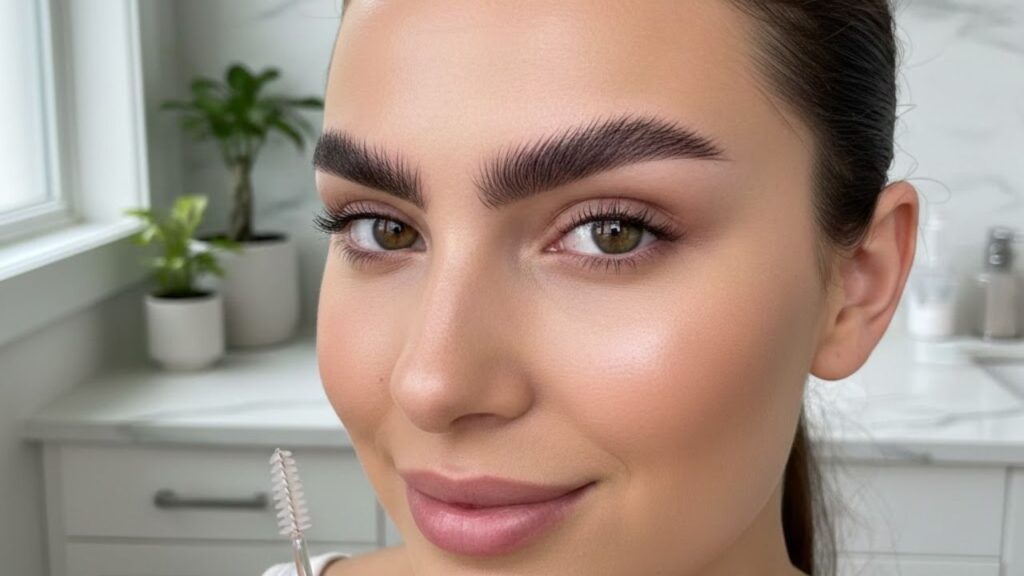
At-home brow lamination sounds far more technical than it really is. The goal is simply to guide your natural brow hairs so they stay in your preferred direction for longer, creating a fuller and more defined appearance. You’re not drawing on a new shape. You’re encouraging your own brows to look their best.

Once you remove the intimidation factor, the process becomes clear. While salons talk about solutions and activators, at home it comes down to a simple pattern: soften the hairs, shape them, set them, and nourish them afterward. When you understand this flow, it stops feeling like a chemistry experiment and starts to feel like a routine you can comfortably repeat every few weeks.
Preparing Your Brow Tools
A Small Setup That Makes a Big Difference
Before touching your brows, take a moment to prepare your space. Clear a section of the counter, move aside stray hair ties, and line up your tools in the order you’ll use them. This simple setup creates a sense of calm that makes the entire process feel surprisingly soothing.
Most effective at-home lamination routines rely on just a few essentials. Some people choose full brow lamination kits, while others prefer gentle alternatives already at home. These may include mild lash-lift products or soft-setting formulas labeled safe for use near the eyes. Whichever route you choose, the principle stays the same: use minimal product and always opt for the gentlest method possible.
Essential Items and How They Help
- Soft facial cleanser – Removes oil, makeup, and residue; choose a mild, soap-free option for sensitive skin.
- Brow spoolie – Aligns and styles brow hairs; a clean mascara wand works well as an alternative.
- Brow lamination formula – Relaxes hairs for reshaping; always do a patch test at least 24 hours beforehand.
- Setting or fixing solution – Locks hairs into place; apply lightly to avoid weighing brows down.
- Hydrating oil or serum – Nourishes brow hairs and skin; castor oil or a lightweight brow serum works best overnight.
Standing in front of the mirror with these simple tools makes the process feel less like a procedure and more like intentional self-care. You’re not trying to become a professional overnight. You’re learning how your brows naturally grow and gently shaping them into a look that feels right for you.

A Slow and Thoughtful Brow Routine
Letting the Process Unfold
Your first at-home lamination should never feel rushed. Move slowly enough to notice the sound of running water, the coolness of your fingers against your skin, and the faint scratching sensation as the spoolie moves through your brows. The process isn’t just about the result—it’s about giving yourself a few quiet, unrushed minutes.
Start With a Clean Base
Brows collect more than you think—sunscreen, moisturizer, makeup residue, and even oil from unconscious face-touching. Begin by cleansing the area with a gentle, fragrance-free wash. Rinse with lukewarm water and pat dry using a soft towel. Follow with a cotton pad to ensure no residue remains. When brows are completely clean, each hair stands more freely, like grass after rain.
Understand Your Natural Brow Pattern
Before applying any product, take time to truly observe your brows. Use a clean spoolie to brush them upward and watch how each hair behaves. Some will lift easily, others prefer to lie flat, and a few may angle outward. Notice any sparse areas, thinning tails, or uneven arches. Understanding these natural patterns helps you decide how to guide the hairs in the next step.
Softening Brows for Reshaping
Using a micro brush or cotton swab, apply a small amount of your lamination or lifting solution directly onto the brow hairs, keeping it away from the skin. Think of this step as softening clay before shaping it. The solution relaxes the hair structure so it can be repositioned and hold its new direction.
Gently comb the product through your brows with a spoolie, brushing upward and slightly outward based on the plan you observed earlier. Take your time. You’ll notice the hairs beginning to stay where you place them. Allow the solution to sit for the duration recommended in the instructions—usually just a few minutes. If your brows are fine or delicate, less time is always better than more.